
I was very glad to see that in my previous post, Part 1, that a lot of people found it helpful. Although I'm very modest with spreading my posts around and annoying everyone, I hope that maybe it'll make its way around the blogsphere.
Recapping from previous post, leaving off from the light settings about your camera, the main settings that control your camera's settings include:
• ISO
• Exposure Compensations
• White Balance
• Aperture (f-stop)
• Shutter Speed
This post will cover both Aperture and Shutter Speed which go hand in hand for the most part in setting your manual cameras. Unfortunately this post doesn't really help out a lot for those with point and shoot cameras, but do keep in mind these settings are a part of those cameras too, they're just preset already for you so that you don't have to worry about it. I guess you can say that it can help you understand how your camera may work.
For those of you that do use point and shoots on the regular, ever notice when you change your preset scenarios to anything that has to do with dim lighting or "night" lighting and the movement appears slow, or if something moves too quickly and you press the shutter, your object appears blurred? Those have to deal with shutter speed and aperture.

( Lifehacker )
Now first thing's first, DON'T BE AFRAID TO TURN THE DIAL TO M(ANUAL)!!! One thing that makes me upset when I see people with beautiful SLR cameras (especially nice, expensive ones that are nicer than what I may have) is when they put it on Auto! Sure, yes, Auto will still take decent photographs, but they're pretty much the equivalent of having a point and shoot, minus the bulk of a separate lens and a bigger battery. Once you grasp how to adjust your camera to their proper settings, you'll begin to appreciate and love your camera even more.
Aperture
The Aperture refers to the opening inside the lens of the camera and controls the amount of light that passes through it. You may have seen this before:
( Media Formations )
Those are some typical aperture settings or openings, also known as f-stop, hence the f in front of the numbers. The confusing thing about F-stops are the numbers in relation to their size. The bigger the f-stop #, the SMALLER the opening. The smaller the f-stop #, the BIGGER the opening. As seen above, f/2 is wider than f/16. How do you determine what size you need? It all depends on your situation. When it's super bright and sunny, or if you're using studio lighting, you should probably have a smaller Aperture opening so that your photo does not become overexposed or washed out. Then, in the opposite situation—a dark lighting situation—you would use a smaller opening. Think of it as your eye. Ever notice how your pupil becomes SUPER dilated at night time when you look in a mirror? That's because your eye's opening is trying to gather in as much light as possible for you to see. The same happens when it comes to bright sunlight—your pupil becomes very small to keep the light from damaging your eyes. In essence, the lens is the eye of the camera.
Aperture also serves another purpose as well in which you can take into consideration when you're looking to get a specific look to a photo. I'm talking about Depth of Field (DOF). Depth of field is pretty much how clear something appears in a photo, according to its distance. There are 2 kinds of Depth of Field: Shallow and Deep.
SHALLOW pertains to a short distance of sharpness. Think almost Macros, portrait photography, and bokehs. The object closest to the camera is in focus, whereas the background appears blurred. To achieve a shallow depth of field, you would need a larger aperture opening, or a smaller f-stop. In the photo below, I used f/1.8
( photo taken by me )
You would use shallow depth of field for: highlighting certain objects, portraits, isolating an object amongst many of the same thing, etc. Also keep in mind, the closer that you are to said object, the shallower the depth of field will be regardless.
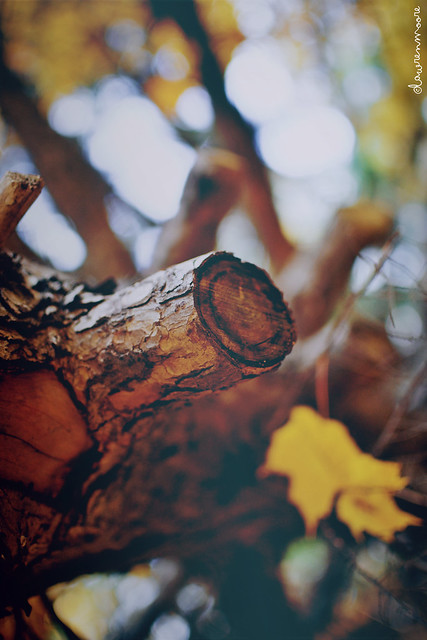
DEEP pertains to a wider/broader distance of sharpness. Basically any photo in which everything is in focus. It can be anything! A picture of a landscape, a picture of you in front of a building, etc. —a photo in which you want everything to be present. In the photo below of my friend, I used f/13.

( photo taken by me )
You would use deep depth of field for: whatever and whenever! Basically any f-stop over about f/4 or f/5.6 constitutes as deep depth of field.
Shutter Speed
Shutter speed is pretty self explanatory: it's the speed at which the shutter opens, allowing light to be exposed to film, but in this case, to the digital sensors. Generally shutter speeds come in increments of fractions of seconds.
( Soerenhese )
Shutter speed dials used to look like the above photo. It was on your camera and you can easily switch the dial. It's a bit different for DSLRs, but it still kind of gives you the same feel of turning a "dial" to change the shutter speed. Shutter speeds can range from 1/4000th of a second, up to 30 seconds, plus B(ulb).
Depending on how long you have to shutter open for, the more light gets let in. You know those cool night photography photos of cars with streaming lights? A longer shutter speed (generally anywhere from half a second to full seconds) will create these photos. What about those cool photos of people who "draw" with light? Those are also taken with longer shutter speeds:

( Taken by my friend Gabby )
The above can be created with a steady camera, mounted by a tripod and a longer shutter speed or Bulb. What is BULB? Bulb lets you decide how long you want the shutter to remain open. It'll open when you press down the shutter release button and it'll close once you remove your finger. It gives you the freedom to decide.
What about those photos of fast moving objects that seem like they're caught in motion?

( © Berserker MD )
( © bob2506eos )
Both photos are taken with faster shutter speeds. There are also different other techniques that can be used to get certain effects when used for taking action shots like the car above. To achieve this, set your shutter speed to something fast and pan (follow) your camera along with the object in the same direction that it's going. Basically, pretend you're filming the car going from your left to your right. Follow along and snap the photo. The lines should appear in the background with the main focus (the car) in focus.
How does aperture and shutter speed work together?
Well, aperture controls how much light and shutter speed controls how long the light enters. You can use the 2 to create ideal crisp, well lit photos, or cool, neat effects.
( Kelehen )
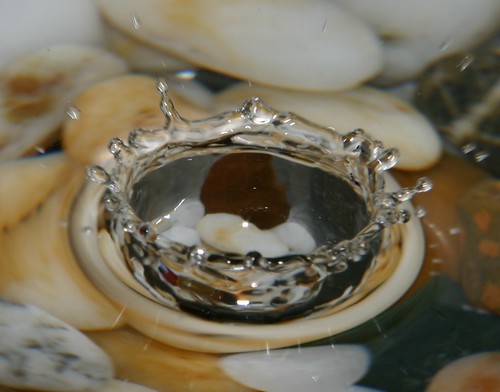
Ever wonder how to achieve those "dreamy" flowing rivers or waterfall effects? Playing around with the shutter speed and aperture will let you achieve the above. Here's how:
Shutter Speed: 2
ISO: 100
As you can see, this photographer used a very small aperture opening, along with a low ISO (light sensitivity) and a longer shutter speed of 2 whole seconds, which in photography is a long time for the shutter to be opened. The small aperture setting allows the smallest amount of light to enter in the camera, while the low ISO setting of 100 minimizes the camera's sensitivity to the light to prevent overexposure while the shutter is open for 2 seconds.
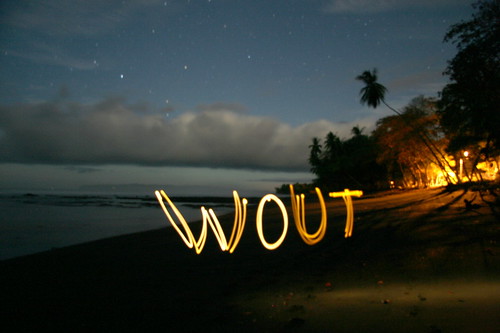
( © astrowout )
How about those "light painting" photos? How do people get it so that you can barely, if not, see the person in them? The longer the shutter is open and depending on how quick the object/person is moving, they virtually become invisible because there isn't enough light during those little instances to pick them up wherever they may be in the photo.
That being said, did you know that you can take pictures of say, famous attractions and tourist destination spots, filled with people and have your photo look like you were the only one there? Using the same concept as above, you can get those empty, beautiful photos with only just time, patience and a sturdy tripod. Tourists spots don't just close so that a photographer may take a picture of it for the brochure. Photographers have been using this technique to get those "empty" photos in brochures everywhere. (Although yes, it's possible they may have been able to get the place to themselves). Again, you'll need a very small aperture setting—whatever is the lowest on your lens—a low ISO setting (usually somewhere around 100), and a loooong shutter speed. Of course, naturally, you will need to experiment with times.
Resources
Here are some resources that you can use to help you with learning about your camera's settings or how you can adjust your settings to get that photo that you're dreaming of:Photography Cheat Sheet
Created by Living in the Stills, this "cheat sheet" is amazing and it's everything you need to help you out with understanding manual settings. I would definitely recommend printing it out and sticking it in your camera bag if you're serious about learning manual photography. (click to see larger)

Flickr EXIF data
Unless you don't have programs on your computer that lets you view photos EXIF data, people on Flickr have it enabled so that you can see how they achieved their photos. (Keep in mind that not all users select the option to show it). EXIF data pretty much shows you all the camera's and photo's information including the model, shutter speed, aperture, ISO, whether flash was used and even what mode you shot in (i.e. manual, auto, etc). It's a great tool to understanding how certain photos were achieved.


The Camera Simulator
The Camera Simulator is something you can try even before you purchase an SLR to get a feel for using manual settings. If that's not challenging enough, you have a moving subject to try and capture! It's interesting to use, however I find that sometimes it's not as true to a real camera, but nonetheless, try playing around with it. (click to visit site)

Thanks for reading my little mini-series here. I hope you learned some things. I know that there is soooo much to cover with photography, but I just want to lay down the basics here about lighting and how understanding photography and how cameras work, you may realize that you can work with what you have and not have to invest in expensive lighting equipment right away.
Again, I'm not at all discouraging anyone from buying what they want, just simply educate yourself before you do!
Feel free to ask any questions about anything, even if it may not be covered here!


You know I love your photography posts, this one's by far my fave blog post of all time. And probably even more exciting than Fleetwood Mac's world tour announcement. I've been looking for sth. like the EXIF information since I found out about bokeh haha. I praise Flickr for passion for detail. Thanks so much for sharing your secrets!!!
ReplyDeleteHaha really? ^^; I find that hard to believe since I know you're a die hard Fleetwood Mac fan :P
DeleteThank you, thank you, I'm glad you enjoyed it and found it useful and "exciting". Flickr is such an amazing community for any kind of photographer! There's so much inspiration and knowledge and variety *~*
*praise Flickr for ITS passion for detail. Damn, why do I never proofread.
DeleteAlso, that cam simulator is pretty fancy. Let's just hope my photos will actually improve!